How to Clean & Oil a Watch:
A Beginners Guide - Section 6
Written by: Kevin James
Copyright © Kevin James. All Rights Reserved.
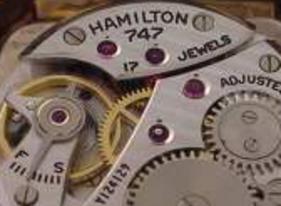
What are Jewels?
Before the advent of "Jeweled" watches, tiny holes were drilled directly in the steel plates and bridges where the "pivot" of the gears would rest and rotate. Over time the constant rubbing metal against metal would wear the hole and it would get larger. This would allow the gears to wobble and the watch would eventually stop working. In the early 1700's it was discovered that using tiny slivers of shaped ruby with a hole in the center lasted much longer. But rubies were expensive and were placed in only very high quality watches. In the early 1900's synthetic rubies were invented and became widely used in watchmaking. You may have noticed that there are tiny red or pink dots at various places in the bridges and the pillar plate. These are the jewels.
Cleaning
Place the "Pillar Plate" in a small plastic cup with some parts cleaner. Let it soak for a few minutes. Then take your brush and thoroughly brush both sides of the plate paying special attention to the jewel holes. If the watch is very dirty, you may want to replace
the solution and clean twice. Once you are satisfied that it is clean, remove it from the solution and place it on a piece of "watch paper". Use your blower to dry it off. Later on you will be able to clean all of your parts at once, because even jumbled you will know where they go. For now however, go one section of the parts tray at a time cleaning and drying in this manner. Make sure to clean between the gears and in the jewel holes of all of the moving parts. Once they are dry, replace them to the tray. Clean the balance VERY VERY carefully. Also, Do NOT submerge the MAINSPRING as it will take on solution and it will rust. If there is a Jewel hole on the Mainspring Bridge, you should remove the screw that holds the Mainspring barrel in place and set it (the mainspring barrel) aside and then clean the plate. Or you can simply brush the hole with a wet brush a few times until you are satisfied that it is clean and then let it dry.
Oiling
The Cardinal Rule: Using Too much oil will attract dust and stop your watch faster than if you use too little. The only part of the watch that needs oil is the pivot or jewel holes. Again, this is where the posts or "pivots" of the various gears rest and rotate. One side of the hole is always flat (or sometimes capped with another jewel), and the other is usually recessed like a tiny bowl. This "bowl" is where you will place one tiny drop of oil. You don't fill the recess either. Just a teensy-tiny drop in the center of the recess. Carefully oil all of the holes on the bridges and the on the pillar plate (HINT: I usually install the Pallet Fork before oiling the balance jewel. This prevents oil from getting on the fork)
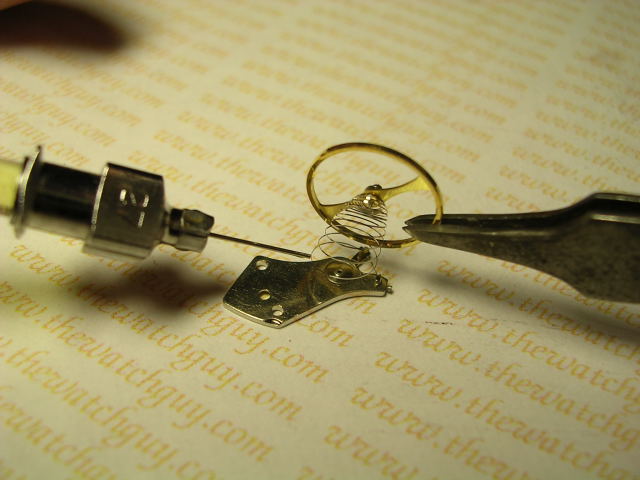
Oiling most of the jewel holes is very straightforward with the exception of the jewel in the balance cock. When you remove the balance and balance cock, place it on the bench - balance wheel up. Removing the balance wheel and hairspring from the balance cock is very tricky - so it is not advisable to take it apart to oil the hole. Simply (and gently) lift the balance wheel with your tweezers and stretch the hairspring slightly. Just enough to get the oiler in there to put a tiny drop of oil directly into the jewel hole.
Hint: If you you touch any of the coils with the oiler, this will get oil on it. ANY oil on the hairspring will cause the coils to stick together and the watch will not run right. If this happens you will need to dunk the balance into cleaner to remove the oil. Then dry it with they blower, and try again.
Reassembly
Now you have everything clean, oiled, and organized in front of you, simply work backwards and reassemble.
Install the Pallet Fork and Arbor (PF&A). Some things to note here: There are usually (but not always) two pins called banking pins. The Pallet Fork sits between these two pins. The pins limit the motion of the pallet back and forth. The pallet fork also has three prongs - or forks. Look closely...the center prong sticks out. When reassembling - put this center prong DOWN - towards the pillar plate.
Install the bridge and the screws that hold the pallet in place. Don't forget to oil the jewel-hole. Also, make sure it is in properly. To test this, rock the movement back and forth. The fork should, by force of gravity, rock back and forth.
Install the next "funny looking" gear. into the jewel hole. This gear is called the escape wheel. The little prongs will line up with the back of the pallet.
Install the next gears (in reverse order) as they were removed.
Install the bridge that holds the top of the gears in place. You will need to wiggle the gears one at a time with a screwdriver before the bridge settles in place and all of the pivots are in the holes. Sometimes you can get this in a matter of seconds, and sometimes it can be really frustrating - BE PATIENT.
IMPORTANT: Install the screws slowly, and test the gears to make sure they seem to be loose or "fluid". Using a screwdriver you can also gently push up/down on the gear and see if it slides up and down in the jewel hole. As you tighten the screws keep checking the gears...If they seize as you tighten STOP. This means one of the pivots is not properly inserted in it's pivot hole.
Install the other gears and bridges in the same fashion as mentioned above, and in the reverse order that they were placed in the tray.
When installing the barrel bridge, use a screwdriver (or the crown/stem if installed) to turn the winding mechanism a little. This will engage the gears. Once the bridge is tightly in place, inspect and test the setting mechanism located on the reverse (dial side) of the movement. Make sure everything looks to be in the right order. On a pocket watch, push a screwdriver in the hole. This should engage/disengage the gears. On a wrist watch with the crown in place as mentioned above... click the crown and stem in and out a few times to make sure the gears engage/disengage the setting mechanisms.
Install the Balance. This is tricky, and may take some time to make sure it is in right. Gently hold it as described above and gently place it as near to where it belongs as possible. You will need to gently wiggle it around and gently press down on the regulator until you "feel" that it is in right. IT SHOULD SWING FREELY. If it doesn't seem to work, partially (and gently) remove it partially and try again. There is only ONE way it goes. Once it is in place and swinging back and forth freely, you can move on.
You may wind the watch now to see if it starts up.
Hopefully it is running... Turn it over and install the cannon pinion over the center post. Push it down gently with the tweezers. Install the Hour Wheel.
Install the dial. Tighten the screws.
Install the hands at 12 O'clock to assure proper alignment. Use the hands pushing tool to push the hands down over the post. The hands should be HORIZONTAL with the dial. Should be close to the dial but not touch the dial or the markers. They should not touch each other. You may use your tweezers CAREFULLY to straighten, bend, or align your hands.
Replace the movement in the watch the way it was removed.
Close the case.
DONE!!!!! I Hope it went well!!!!
********WARNING*******
THE ABOVE INFORMATION WAS WRITTEN TO HELP BEGINNING WATCH REPAIR ENTHUSIASTS LEARN ABOUT A FUN HOBBY. ANY SUGGESTIONS MADE HEREIN ARE TO BE FOLLOWED AT YOUR OWN RISK. ANY INJURY OR DAMAGE CAUSED TO PERSON OR PROPERTY ARE YOUR SOLE RESPONSIBILITY.